Tiger Breads Recipe
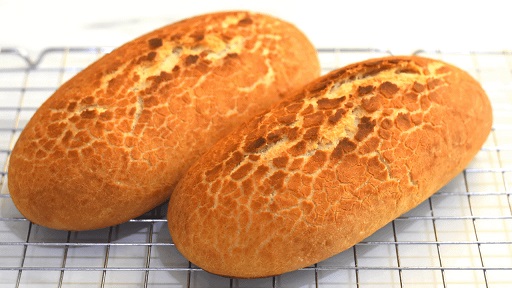
Tiger bread, also known as Dutch Crunch bread, is a delightful loaf characterized by its soft, airy interior and a unique, crackled crust. This distinctive bread gets its name from the striking tiger-like pattern on its crust.
Perfect for sandwiches or simply enjoying with butter, tiger bread adds a fun and flavorful twist to your baking repertoire. This guide will walk you through the steps to create this delicious bread at home, ensuring you get the perfect crunch and texture every time.
Why Make Tiger Bread at Home?
Homemade tiger bread offers several advantages over store-bought versions. The freshness of home-baked bread is unmatched, and you have complete control over the ingredients, ensuring no preservatives or artificial additives.
Moreover, the process of making bread from scratch is incredibly rewarding, filling your home with the wonderful aroma of fresh baking and providing a sense of accomplishment when you see that beautiful crackled crust emerge from the oven.
Ingredients for Tiger Bread
Before you start, gather the following ingredients:
For the Bread Dough:
- 4 cups all-purpose flour: Provides the structure for the bread.
- 2 teaspoons salt: Enhances the flavor.
- 2 tablespoons sugar: Adds a touch of sweetness and feeds the yeast.
- 2 ¼ teaspoons active dry yeast: Leavens the dough.
- 1 ¼ cups warm water (about 110°F/43°C): Activates the yeast.
- 2 tablespoons olive oil: Adds moisture and richness to the bread.
For the Tiger Paste:
- ½ cup rice flour: Creates the unique crackled crust.
- 1 tablespoon sugar: Adds sweetness to the crust.
- ¼ teaspoon salt: Balances the flavors.
- ½ teaspoon active dry yeast: Helps create the crackled texture.
- ¼ cup warm water (about 110°F/43°C): Activates the yeast.
- 1 tablespoon vegetable oil: Adds moisture to the paste.
Step-by-Step Instructions
Step 1: Prepare the Bread Dough
In a large mixing bowl, combine the flour, salt, and sugar. In a separate bowl, mix the warm water and yeast, letting it sit for about 5 minutes until it becomes frothy. Add the yeast mixture and olive oil to the flour mixture, stirring until a shaggy dough forms.
Step 2: Knead the Dough
Transfer the dough to a lightly floured surface. Knead by hand for about 10 minutes until the dough becomes smooth and elastic. Alternatively, you can use a stand mixer with a dough hook attachment, kneading on medium speed for about 7-8 minutes. The dough should be soft but not sticky. If it’s too sticky, add a little more flour, a tablespoon at a time.
Step 3: First Rise
Place the dough in a greased bowl, turning it once to coat the top. Cover the bowl with plastic wrap or a damp kitchen towel and let it rise in a warm, draft-free place for about 1 to 1 ½ hours, or until it doubles in size.
Step 4: Prepare the Tiger Paste
While the dough is rising, prepare the tiger paste. In a small bowl, combine the rice flour, sugar, salt, and yeast. Add the warm water and vegetable oil, stirring until smooth. The paste should be thick but spreadable. Cover the bowl with plastic wrap and let it sit at room temperature until ready to use.
Step 5: Shape the Loaves
Once the dough has risen, punch it down to release the air. Transfer it to a lightly floured surface and divide it into two equal pieces. Shape each piece into a loaf or a round boule. Place the loaves on a greased or parchment-lined baking sheet.
Step 6: Apply the Tiger Paste
Carefully spread the tiger paste evenly over the tops of the loaves using a pastry brush or spatula. The layer should be thick enough to cover the surface but not so thick that it drips down the sides. Cover the loaves with a kitchen towel and let them rise for another 20-30 minutes.
Step 7: Preheat the Oven
While the loaves are rising, preheat your oven to 375°F (190°C). This ensures that the oven is hot enough to bake the bread evenly and develop the characteristic tiger pattern.
Step 8: Bake the Bread
Bake the loaves in the preheated oven for 25-30 minutes, or until they are golden brown and sound hollow when tapped on the bottom. The tiger paste should form a crackled, crunchy crust.
Step 9: Cool and Serve
Remove the loaves from the oven and let them cool on a wire rack for at least 30 minutes before slicing. This allows the bread to set and makes slicing easier. Enjoy your homemade tiger bread with butter, as a sandwich base, or simply on its own.
Tips for Perfect Tiger Bread
Use Rice Flour for the Paste: Rice flour is essential for creating the signature crackled crust. Don’t substitute it with other flours.
Proper Kneading: Kneading develops the gluten, which is crucial for the bread’s structure and texture.
Warm Environment for Rising: If your kitchen is cool, place the dough in a slightly warm (but turned off) oven to rise.
Don’t Rush the Rising Process: Allowing enough time for both rises ensures a better texture and flavor.
Apply the Paste Generously: Ensure the paste is thick enough to create the desired crackled effect.
Health Benefits of Tiger Bread
While tiger bread is a delicious treat, it also offers some nutritional benefits:
Rich in Carbohydrates: Provides energy.
Low in Fat: A healthier choice compared to some enriched breads.
Versatile Base: Can be paired with nutritious toppings like vegetables, lean proteins, and healthy spreads.
Storing and Freezing
Store your tiger bread at room temperature in a paper bag or bread box for up to 2 days to maintain its crisp crust. For longer storage, wrap the bread tightly in plastic wrap and aluminum foil, then freeze for up to 3 months. To thaw, leave the bread at room temperature, then reheat in the oven at 350°F (175°C) for 10 minutes.
Delicious Ways to Enjoy Tiger Bread
Tiger bread’s unique flavor and texture make it perfect for various culinary uses:
- Sandwiches: The ideal bread for hearty sandwiches.
- Toast: Enjoy with butter, jam, or avocado for a delicious breakfast.
- Dipping: Serve with olive oil and balsamic vinegar for a simple, flavorful starter.
- Garlic Bread: Turn it into a garlicky delight by toasting with garlic butter and parsley.
Conclusion
Baking tiger bread at home is a rewarding experience that brings the fun and flavor of this unique loaf to your kitchen. With its crunchy crust and soft, airy interior, tiger bread is perfect for sandwiches, appetizers, or simply enjoying on its own.
This easy-to-follow recipe and helpful tips will guide you to success, whether you’re a novice baker or an experienced one. So, gather your ingredients and get ready to bake delicious homemade tiger bread. Your taste buds will thank you!