Focaccia Bread with Rosemary and Olive Oil Recipe
Hey there, bread lovers! Are you ready to embark on a delicious journey that’ll fill your kitchen with the irresistible aroma of freshly baked focaccia?
Trust me, once you’ve tried making this rosemary and olive oil focaccia, you’ll never look at store-bought bread the same way again.
Not only is this recipe incredibly easy to follow, but it also brings a slice of Italian sunshine right into your home. So, roll up your sleeves, and let’s get baking!
First things first, what exactly is focaccia? It’s an Italian flatbread that’s a bit like pizza’s fluffier, more sophisticated cousin. It’s known for its dimpled surface, crispy edges, and a soft, airy interior that’s perfect for soaking up olive oil and herbs.
Traditionally, it hails from Liguria, a coastal region in Northern Italy, where it’s often enjoyed as a snack, appetizer, or even as a delightful sandwich bread.
Now, let’s talk about what makes our focaccia special: rosemary and olive oil. Rosemary is a fragrant herb that adds a woodsy, slightly peppery flavor to the bread. It pairs beautifully with the fruity, rich taste of good quality olive oil. Together, they create a symphony of flavors that’ll transport you straight to the sun-drenched hills of Italy.
But before we dive into the recipe, let’s chat about why making your own focaccia is so rewarding. First off, the process is incredibly therapeutic.
There’s something deeply satisfying about working with dough, feeling it transform beneath your hands from a shaggy mess to a smooth, elastic ball. Plus, when you bake it yourself, you control the ingredients. No weird preservatives or additives here – just simple, wholesome goodness.
Alright, ready to make some magic? Here’s what you’ll need for your rosemary and olive oil focaccia:
Ingredients:
- 4 cups all-purpose flour
- 2 teaspoons salt
- 2¼ teaspoons (1 packet) active dry yeast
- 1½ cups warm water (around 110°F)
- ¼ cup extra-virgin olive oil, plus more for drizzling
- 2 tablespoons fresh rosemary leaves, roughly chopped
- Flaky sea salt (like Maldon) for topping
Now, let’s break this down step by step:
Wake Up the Yeast: In a small bowl, mix the warm water with a teaspoon of the flour and the yeast. Let it sit for about 5-10 minutes until it gets foamy. This is how you know your yeast is alive and ready to party!
Mix the Dough: In a large bowl, mix the remaining flour and salt. Make a well in the center and pour in the yeast mixture and olive oil. Mix with a wooden spoon or your hands (I prefer hands – it’s more fun!) until you get a shaggy dough.
Knead, Baby, Knead: Turn the dough out onto a lightly floured surface. Now comes the fun part – kneading! Push the dough away from you with the heels of your hands, fold it back over, give it a quarter turn, and repeat. Do this for about 8-10 minutes until the dough becomes smooth and elastic. It’s a bit of a workout, but trust me, it’s worth it!
First Rise: Place the dough in a lightly oiled bowl, cover with a damp kitchen towel, and let it rise in a warm spot for about an hour, or until it doubles in size. I like to put mine in the oven with just the light on – it creates the perfect cozy environment for yeast to do its thing.
Get Your Pan Ready: While your dough is rising, grab a baking sheet (about 9×13 inches) and pour in a good glug of olive oil. Use your hands to spread it all over the bottom and sides. This is what gives your focaccia that irresistible crispy crust.
Shape and Second Rise: Once your dough has doubled, punch it down (very satisfying!) and plop it into your oiled pan. Use your fingers to gently stretch it out to fill the pan. If it resists, let it rest for 5-10 minutes and try again. Once it’s evenly spread, cover it and let it rise for another 30 minutes.
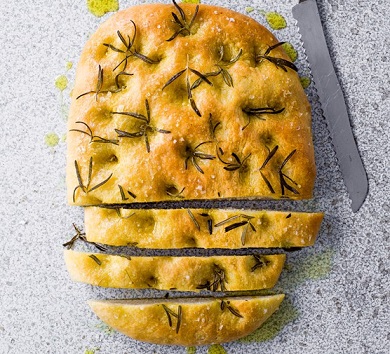
Dimple Time: This is the signature move for focaccia. Use your fingertips to press deep dimples all over the dough. Don’t be shy – these little dents are what give focaccia its classic look and help hold all that delicious olive oil and rosemary.
Flavor Town: Drizzle more olive oil into those dimples, then sprinkle over your chopped rosemary and a generous pinch of flaky sea salt. The salt adds a nice crunch and brings out all the flavors.
Bake to Perfection: Pop your focaccia into a preheated 425°F (220°C) oven for about 20-25 minutes. You’ll know it’s done when the top is golden brown and it sounds hollow when you tap the bottom.
The Hardest Part: Let it cool in the pan for about 5 minutes, then transfer to a wire rack. I know it’s tempting to dive right in, but giving it a few minutes to cool will make it easier to slice without squishing all those beautiful air pockets.
And there you have it! Your kitchen now smells like an Italian bakery, and you’ve got a gorgeous slab of rosemary and olive oil focaccia to show for your efforts. Rip off a piece while it’s still warm, and marvel at that perfect contrast between the crispy, olive-oil-infused crust and the soft, airy interior.
Now, let’s talk serving suggestions because this focaccia is incredibly versatile. It’s perfect on its own, of course, maybe with a little extra olive oil for dipping. But it also makes an excellent base for sandwiches. Try it with some prosciutto, fresh mozzarella, and arugula for a true Italian experience. Or how about topping it with some halved cherry tomatoes before baking for a focaccia-pizza hybrid?
Leftovers (if you have any!) will keep well for a couple of days in an airtight container. You can revive it with a quick stint in a 350°F (175°C) oven. Or, do as the Italians do and use slightly stale focaccia to make “panzanella,” a refreshing salad of bread, tomatoes, onions, and basil dressed with olive oil and vinegar.
One of the joys of this recipe is how customizable it is. Not a rosemary fan? Try oregano, thyme, or even some za’atar for a Middle Eastern twist. You could also top it with olives, thinly sliced onions, or grated parmesan before baking. The world of focaccia is your oyster!
But what if things don’t go quite as planned? Don’t worry, every bread baker has been there. If your dough isn’t rising, your room might be too cool. Try the oven-light trick I mentioned earlier. If your focaccia turns out a bit dense, you might have used too much flour or not kneaded enough. Remember, it’s all part of the learning process. Even imperfect focaccia is still delicious focaccia!
Now, let’s geek out a bit on the science of bread-making. That magical transformation from flour, water, and yeast to a golden loaf is all down to fermentation. When you mix water and flour, you’re creating food for the yeast. As the yeast eats, it releases carbon dioxide, which gets trapped in the dough’s gluten network, making it rise. The olive oil in our recipe also helps keep things tender by coating some of the flour proteins, preventing them from forming too much gluten.
And hey, if you’re watching your carbs or gluten intake, don’t feel left out. Many bakers have had success making focaccia with alternative flours like chickpea or almond. It won’t be exactly the same, but it’ll still be tasty. Or, you could use this topping combo on a cauliflower crust for a low-carb spin.
In a world of quick, pre-packaged everything, taking the time to make something like this rosemary and olive oil focaccia is a small act of rebellion. It’s saying, “Hey, I value quality, tradition, and the simple pleasure of working with my hands.” Plus, the joy of sharing something you’ve made from scratch with friends and family is truly unbeatable.
So, whether you’re a seasoned baker or a total newbie, I encourage you to give this focaccia a try. Put on some Italian music, pour yourself a glass of wine (or sparkling water with lemon!), and enjoy the process. Remember, the goal isn’t perfection – it’s the joy of creating something delicious and the stories you’ll share over each slice.
Buon appetito, my friends! Here’s to many happy baking adventures and the mouthwatering aroma of rosemary and olive oil focaccia wafting through your home. Trust me, your future self (and your lucky neighbors) will thank you. Happy baking!