Gluten Free Breads Recipe
Finding a good Gluten free bread can be challenging, but making your own at home can be a game-changer. Whether you have celiac disease, gluten sensitivity, or just prefer to avoid gluten, this guide will help you create delicious and nutritious Gluten free bread.
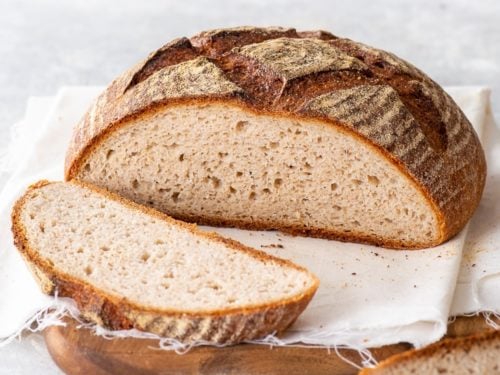
This bread is not only free of gluten but also boasts a soft, tender crumb and a wonderful flavor, making it perfect for sandwiches, toast, or enjoying on its own.
Why Make Gluten free Bread at Home?
Baking Gluten free bread at home allows you to control the ingredients, ensuring a healthier, preservative-free loaf. Store-bought Gluten free bread can often be dense, dry, and loaded with additives.
Homemade bread, on the other hand, can be fresh, moist, and tailored to your taste preferences. Plus, the process of baking your own bread is incredibly rewarding and fun!
Ingredients for Gluten free Bread
To start, gather the following ingredients:
Dry Ingredients:
- 2 cups Gluten free all-purpose flour: Look for a blend that includes a mix of rice flour, tapioca starch, and potato starch.
- 1/2 cup sorghum flour: Adds a mild, sweet flavor and helps with the texture.
- 1/2 cup tapioca starch: Provides elasticity and chewiness.
- 1/4 cup flaxseed meal: Adds fiber and helps bind the ingredients.
- 2 teaspoons xanthan gum: Mimics the elasticity of gluten.
- 2 teaspoons instant yeast: Leavens the dough.
- 1 1/2 teaspoons salt: Enhances flavor.
Wet Ingredients:
- 1 1/4 cups warm water (about 110°F/43°C): Activates the yeast.
- 1/4 cup olive oil: Adds moisture and richness.
- 2 tablespoons honey: Adds sweetness and helps with browning.
- 2 large eggs: Provide structure and moisture.
- 1 teaspoon apple cider vinegar: Enhances the dough’s texture and flavor.
Step-by-Step Instructions
Step 1: Prepare the Dry Ingredients
In a large mixing bowl, combine the Gluten free all-purpose flour, sorghum flour, tapioca starch, flaxseed meal, xanthan gum, instant yeast, and salt. Whisk until well combined. This ensures that all the dry ingredients are evenly distributed.
Step 2: Mix the Wet Ingredients
In a separate bowl, whisk together the warm water, olive oil, honey, eggs, and apple cider vinegar until well combined. Make sure the water is not too hot to avoid killing the yeast.
Step 3: Combine the Ingredients
Pour the wet ingredients into the dry ingredients. Using a stand mixer with a paddle attachment or a hand mixer, beat the mixture on medium speed for about 3-4 minutes. The dough will be sticky and more like a thick batter than a traditional bread dough. This consistency is normal for Gluten free bread.
Step 4: First Rise
Scrape the dough into a greased 9×5-inch loaf pan. Smooth the top with a spatula. Cover the pan with a clean kitchen towel or plastic wrap and let it rise in a warm, draft-free place for about 1 to 1 ½ hours, or until the dough has doubled in size. The dough should rise to just above the rim of the pan.
Step 5: Preheat the Oven
While the dough is rising, preheat your oven to 375°F (190°C). This ensures that the oven is hot enough to bake the bread evenly and develop a beautiful golden crust.
Step 6: Bake the Bread
Bake the loaf in the preheated oven for 40-45 minutes, or until it is golden brown and sounds hollow when tapped on the bottom. If the top is browning too quickly, you can cover it loosely with aluminum foil during the last 10 minutes of baking.
Step 7: Cool and Serve
Remove the loaf from the oven and let it cool in the pan for about 10 minutes. Then, transfer it to a wire rack to cool completely before slicing. This allows the bread to set properly and makes slicing easier. Enjoy your homemade Gluten free bread with butter, jam, or any of your favorite toppings.
Tips for Perfect Gluten free Bread
Measure Accurately: Use a kitchen scale to measure your ingredients for the best results. Gluten free baking can be finicky, and accurate measurements are crucial.
Use Fresh Yeast: Ensure your yeast is fresh and active. If the yeast doesn’t become frothy during the activation step, it may be expired.
Warm Environment for Rising: If your kitchen is cool, place the dough in a slightly warm (but turned off) oven to rise.
Don’t Rush the Rising Process: Allowing enough time for the rise ensures a better texture and flavor.
Check for Doneness: The bread is done when it sounds hollow when tapped on the bottom. If unsure, use a kitchen thermometer; the internal temperature should be around 200°F (93°C).
Health Benefits of Gluten free Bread
Gluten free bread can be a nutritious addition to your diet:
Digestive Health: Ideal for those with celiac disease or gluten sensitivity.
Nutrient-Dense: Using a variety of flours (like sorghum and flaxseed) increases the bread’s nutrient content.
Lower Glycemic Index: Some Gluten free flours have a lower glycemic index, which can help with blood sugar control.
Rich in Fiber: Flaxseed meal and certain Gluten free flours add fiber, which aids in digestion.
Storing and Freezing
Store your Gluten free bread at room temperature in a bread box or a sealed plastic bag for up to 3 days. For longer storage, wrap the bread tightly in plastic wrap and aluminum foil, then freeze for up to 3 months. To thaw, leave the bread at room temperature, then reheat in the oven at 350°F (175°C) for 10 minutes if desired.
Delicious Ways to Enjoy Gluten free Bread
Gluten free bread’s versatility makes it perfect for various culinary uses:
Sandwiches: The soft, tender crumb is ideal for a variety of fillings, from classic ham and cheese to gourmet creations.
Toast: Enjoy with butter, jam, avocado, or any favorite toppings for a delicious breakfast or snack.
French Toast: Make decadent French toast by soaking slices in a mixture of eggs, milk, and vanilla, then frying until golden.
Bread Pudding: Use leftover bread to make a comforting bread pudding dessert.
Advanced Techniques for Artisan Gluten free Bread
For those looking to elevate their bread-making skills, consider incorporating these advanced techniques:
Using a Preferment
A preferment, such as a poolish or biga, adds depth of flavor and improves the texture of the bread. To make a poolish, mix equal parts Gluten free flour and water with a small amount of yeast (about 1/8 teaspoon) and let it ferment at room temperature for 12-16 hours. Substitute some of the flour and water in the main recipe with the poolish, and adjust the yeast quantity accordingly.
Long, Cold Fermentation
Extending the fermentation process by proofing the dough in the refrigerator overnight (cold fermentation) can enhance the flavor and texture of the bread. The slow fermentation allows for more complex flavors to develop and can make the dough easier to handle.
Conclusion
Baking Gluten free bread at home is a rewarding experience that brings the taste and aroma of artisan bread to your kitchen. With its soft, tender crumb and wonderful flavor, Gluten free bread is perfect for sandwiches, toast, or simply enjoying on its own.
This easy-to-follow recipe and helpful tips will guide you to success, whether you’re a novice baker or an experienced one. So, gather your ingredients and get ready to bake delicious homemade Gluten free bread. Your taste buds will thank you!