Porridge Loaf Recipe
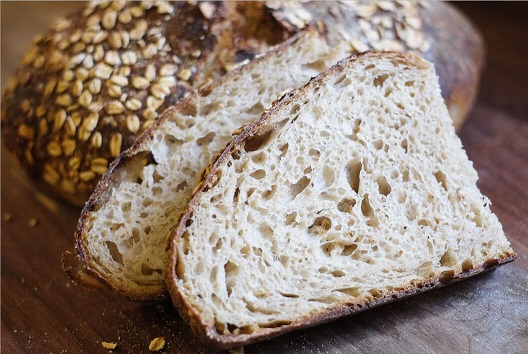
The porridge loaf is a delightful combination of bread and hearty grains, creating a loaf that is both nutritious and delicious. This unique bread incorporates cooked porridge into the dough, resulting in a moist, tender crumb and a rich, complex flavor.
Whether you’re looking for a wholesome breakfast option or a versatile sandwich bread, this porridge loaf recipe will become a staple in your baking repertoire.
Why Make a Porridge Loaf?
Porridge loaf offers several advantages over traditional bread. The inclusion of cooked grains not only enhances the nutritional profile of the bread but also adds a wonderful texture and flavor.
The grains keep the bread moist and tender for days, making it perfect for toasting or enjoying fresh out of the oven. Plus, baking your own bread allows you to control the ingredients, ensuring a healthier, preservative-free loaf.
Ingredients for Porridge Loaf
To start, gather the following ingredients:
For the Porridge:
- 1 cup rolled oats: Provides a hearty texture and nutty flavor.
- 2 cups water: Cooks the oats to a creamy consistency.
For the Bread Dough:
- 3 ½ cups bread flour: Gives the bread its structure and chewiness.
- 2 teaspoons salt: Enhances the flavor.
- 2 tablespoons honey: Adds a touch of sweetness and helps with browning.
- 2 ¼ teaspoons active dry yeast: Leavens the dough.
- 1 cup warm water (about 110°F/43°C): Activates the yeast.
- 1 cup cooked porridge: Adds moisture and richness.
Step-by-Step Instructions
Step 1: Prepare the Porridge
In a medium saucepan, bring the 2 cups of water to a boil.
Add the rolled oats and reduce the heat to low. Cook, stirring occasionally, for about 10 minutes, or until the oats are soft and have absorbed most of the water.
Remove the porridge from the heat and let it cool to room temperature. This step is crucial as adding hot porridge to the dough could kill the yeast.
Step 2: Activate the Yeast
In a small bowl, combine the warm water and honey. Stir until the honey dissolves, then sprinkle the active dry yeast over the top. Let it sit for about 5-10 minutes until it becomes frothy. This step ensures that the yeast is active and ready to leaven your bread.
Step 3: Mix the Dough
In a large mixing bowl, combine the bread flour and salt. Create a well in the center and pour in the yeast mixture.
Add the cooled porridge to the bowl.
Using a wooden spoon or a stand mixer with a dough hook, mix until a shaggy dough forms. The dough should start coming together and pulling away from the sides of the bowl.
Step 4: Knead the Dough
Transfer the dough to a lightly floured surface. Knead by hand for about 10-12 minutes until the dough becomes smooth and elastic. If you’re using a stand mixer, knead on medium speed for about 7-8 minutes. Proper kneading develops the gluten, which is essential for the bread’s structure and texture.
Step 5: First Rise
Place the dough in a greased bowl, turning it once to coat the top. Cover the bowl with a clean kitchen towel or plastic wrap and let it rise in a warm, draft-free place for about 1 to 1 ½ hours, or until it doubles in size.
Step 6: Shape the Loaf
Once the dough has risen, punch it down to release the air. Transfer it to a lightly floured surface and shape it into a rectangle. Roll the dough tightly into a loaf shape, pinching the seams to seal. Place the shaped loaf in a greased 9×5-inch loaf pan.
Step 7: Second Rise
Cover the loaf with a kitchen towel and let it rise for another 30-45 minutes. The dough should rise just above the rim of the pan, creating a nice dome shape.
Step 8: Preheat the Oven
While the loaf is rising, preheat your oven to 375°F (190°C). This ensures that the oven is hot enough to bake the bread evenly and develop a beautiful golden crust.
Step 9: Bake the Bread
Bake the loaf in the preheated oven for 30-35 minutes, or until it is golden brown and sounds hollow when tapped on the bottom. If the top is browning too quickly, you can cover it loosely with aluminum foil during the last 10 minutes of baking.
Step 10: Cool and Serve
Remove the loaf from the oven and let it cool in the pan for about 10 minutes. Then, transfer it to a wire rack to cool completely before slicing. This allows the bread to set properly and makes slicing easier. Enjoy your homemade porridge loaf with butter, jam, or any of your favorite toppings.
Tips for Perfect Porridge Loaf
Use Fresh Yeast: Ensure your yeast is fresh and active. If the yeast doesn’t become frothy during the activation step, it may be expired.
Cool the Porridge: Make sure the porridge is completely cooled before adding it to the dough to avoid killing the yeast.
Proper Kneading: Kneading develops the gluten, which is crucial for the bread’s structure and texture.
Warm Environment for Rising: If your kitchen is cool, place the dough in a slightly warm (but turned off) oven to rise.
Don’t Rush the Rising Process: Allowing enough time for both rises ensures a better texture and flavor.
Check for Doneness: The bread is done when it sounds hollow when tapped on the bottom. If unsure, use a kitchen thermometer; the internal temperature should be around 190°F (88°C).
Health Benefits of Porridge Loaf
Porridge loaf is not only delicious but also packed with nutrients:
Fiber: Rolled oats are a great source of dietary fiber, which aids digestion and promotes satiety.
Complex Carbohydrates: Provides sustained energy throughout the day.
Essential Vitamins and Minerals: Oats are rich in B vitamins, iron, and magnesium.
Lower Glycemic Index: The combination of oats and whole grains can help in better blood sugar control.
Storing and Freezing
Store your porridge loaf at room temperature in a bread box or a sealed plastic bag for up to 3 days. For longer storage, wrap the bread tightly in plastic wrap and aluminum foil, then freeze for up to 3 months. To thaw, leave the bread at room temperature, then reheat in the oven at 350°F (175°C) for 10 minutes if desired.
Delicious Ways to Enjoy Porridge Loaf
Porridge loaf’s versatility makes it perfect for various culinary uses:
Sandwiches: The hearty texture complements a wide range of fillings, from simple ham and cheese to gourmet creations.
Toast: Enjoy with butter, jam, avocado, or any favorite toppings for a delicious breakfast or snack.
French Toast: Make decadent French toast by soaking slices in a mixture of eggs, milk, and vanilla, then frying until golden.
Bread Pudding: Use leftover bread to make a comforting bread pudding dessert.
Advanced Techniques for Artisan Porridge Loaf
For those looking to elevate their bread-making skills, consider incorporating these advanced techniques:
Using a Poolish or Preferment
A poolish or preferment adds depth of flavor and improves the texture of the bread. To make a poolish, mix equal parts flour and water with a small amount of yeast (about 1/8 teaspoon) and let it ferment at room temperature for 12-16 hours. Substitute some of the flour and water in the main recipe with the poolish, and adjust the yeast quantity accordingly.
Long, Cold Fermentation
Extending the fermentation process by proofing the dough in the refrigerator overnight (cold fermentation) can enhance the flavor and texture of the bread. The slow fermentation allows for more complex flavors to develop and can make the dough easier to handle.
Conclusion
Baking a porridge loaf at home is a rewarding experience that brings the taste and aroma of artisan bread to your kitchen. With its moist, tender crumb and rich, complex flavor, porridge loaf is perfect for sandwiches, toast, or simply enjoying on its own.
This easy-to-follow recipe and helpful tips will guide you to success, whether you’re a novice baker or an experienced one. So, gather your ingredients and get ready to bake a delicious homemade porridge loaf. Your taste buds will thank you!
вертикальный обогреватель https://vertikalnyeradiatory.ru.